Back to Earth – and a Weekly Menu Plan

Two weeks holiday was LOVELY!!

I tried to post – I really did! – with all the delicious Italian food there was lots to tell you about – but I had a first generation iPad, a very slow internet connection and the sun and the pool were calling (you understand I’m sure).

So now we’re fighting off that coming-back-to-earth-with-a-bump feeling – and in an effort to shake off those post-holiday blues we celebrated my birthday yesterday.

What better way to celebrate but with Mary Berrys Chocolate Roulade? – made (wait for proud-Mum moment) by my son, whilst I lounged around doing nothing.

It was delicious!
Mary-Berrys-Chocolate-Roulade-2

And, of course, it needed to be eaten with lots of ice-cream.

Mary-Berrys-Chocolate-Roulade-3

But now it’s back to work.

Nothing quite beats that first day back, does it – you’re mind is still in the warm sunny heat of the Italian countryside and wishing yourself back there, and people are asking you for updates on things that you’re not even sure you’ve heard about.

But the holiday was a real blessing – something we’d planned and looked forward to for a long time.
There were lots and lots of delicious meals, cooked by other people, and lots of lovely ideas for new recipes to try in the coming weeks. There was also a lot of pasta and pizza so, unusually for us, I’m not including either of those this week!

What are you doing this week?

Posted in Weekly Menu Plan | 8 Comments

Summer Travels and a Weekly Menu Plan

What are you doing this week?

Apparently 9 years ago today (1st July 2004) NASA sent a 3.3 billion dollar space probe into space – well, actually they’d first sent it out 6 years before this – but on this day it started sending pictures of Saturns rings back to earth. Impressive isn’t it?

We not planning anything quite so adventurous but – and this IS momentous for us – we are on holiday soon – I can’t wait!

So this is a short menu plan as I’m far too excited busy to cook.

We’re getting in the Italian mood, and I have given you a recipe to make both pizza bases and focaccia together (- cook once but eat twice).

Are you off on holiday soon? Where are you going?

Saucepans-italy

Posted in Weekly Menu Plan | 6 Comments

Two-for-One: Garlic and Rosemary Focaccia and Homemade Pizza bases

Click on the headings to see the choices!

This is one of those great recipes where you can cook double and have the basis for two different meals. Just my kind of recipe!

Make some extra bread dough and you can have enough for this Garlic and Rosemary Focaccia and four homemade Pizza bases – which you can freeze if you want to. Homemade pizza bases are the Ultimate Freezer Food in my book – top the frozen bases and cook – no-hassle supper in less than 20 minutes!

My problem when I first came up with this was how to organise it so that you can make the focaccia ahead of time. It is possible to make the dough ahead of time, wrap and keep in the fridge for a couple of days till you need it, but then it needs to warm up again and rise before cooking – all of which takes rather longer than my family want to wait for supper.

Focaccia3

But of course, if you can par-bake pizza bases, why not Focaccia? (yes, I know that the supermarkets thought this one up a long time ago but it took me a while to think this one up!)

So here you are – two for the price of one – make ahead pizza bases and make ahead Garlic and Rosemary Focaccia. I tend to serve it with soup, or cold meats and salad. I’ve given the recipe for both below but if you just want to make the focaccia the quantities for that are in brackets.

Some Focaccia recipes have more water than this. I tried making it that way last week – it started off somewhat like a mountain of what felt like flour and water glue but after about 20 MINUTES kneading it became nicely elastic and not so sticky! I’m afraid that convenience won through and I have gone back to this version – just try not to add extra flour when kneading and knead on an oiled surface.

Garlic and Rosemary Focaccia and Homemade pizza bases

(Makes a large Focaccia and 4 pizza bases)

Ingredients

  • 600g strong white bread flour (200g)
  • 2 teaspoon quick dried yeast (1 teaspoon)
  • 1 teaspoon salt (just under ½ teaspoon)
  • 1 and ½ teaspoons caster sugar (½ teaspoon caster sugar)
  • 3 tablespoons olive oil (1 tablespoons olive oil)
  • 390mls hand-hot water (130 mls)


  • For the Focaccia:

  • 2 teaspoons chopped garlic
  • 1 teaspoon chopped rosemary with extra sprigs
  • Olive oil
  • 3-4 tablespoons grated parmesan

Directions

  1. If you’re using the sort of yeast that needs activating add it to the water and leave to stand for about 15 minutes. If not add to the flour, salt and sugar in a large bowl

  2. Pour the water and oil into the flour. Stir round to mix together. Leave to stand for 5 minutes or so

  3. Knead for 5 – 10 minutes on an oiled surface till springy and elastic – put in an lightly oiled bowl in a warm place covered loosely with either cling film or a tea towel till doubled in size
  4. Bread-dough

  5. Punch the dough down and tip out onto a floured board. Cut into thirds.


  6. For the Focaccia:

  7. Take one third of the dough, leaving the rest covered in the bowl. Flatten out the dough and sprinkle over the chopped garlic and rosemary. Roll up the dough to enclose the herbs and then knead gently for a few minutes until the garlic and rosemary is roughly distributed throughout.

  8. Roll out to fit your (lightly oiled) baking tray (I use one 30cm x 20cm but only cover about ¾ of it). Leave the focaccia in it rising in a warm corner of your kitchen for about an hour, covered so it doesn’t dry out on top.

  9. When you want to par-bake, see below.


  10. For the Pizza bases:

  11. Cut the remaining dough into four equal sized pieces.

  12. Heat the oven to 220ºC, placing your pizza stone or baking tray on the top shelf to heat up.

  13. On a floured surface stretch / roll each piece of dough out into a circle, and then move each onto a piece of baking parchment. Leave to rest for 10 minutes or so while the oven is heating up.

  14. When ready to cook, take the baking tray out of the oven and slide a pizza base onto it using the baking parchment (make sure it will take that heat), and cook near the top of the oven for 3 minutes. Take out and slide off the paper (but don’t throw it away) onto a wire rack to cool. Repeat until all the pizza bases are cooked.

  15. When cooled, stack between the sheets of paper and wrap up in foil / plastic freezer bag and either keep in the fridge if you’re using them soon, or freeze.

  16. When you want to eat them, add your favourite toppings – or try this Four Cheese Pizza which my husband was heard to describe the other day as ‘possibly the best pizza he’s ever had’ – he’s a cautious man!

  17. To cook the Focaccia, let the oven cool to 200ºC. Place a small tray of water on the bottom shelf to create some steam.

  18. Poke fingerholes in the top of the focaccia, brush with olive oil and cook near the top of the oven for about 10 minutes. Remove and cool.

  19. Wrap the focaccia up well and store in the fridge for a day or two. I haven’t tried freezing this yet, but will update this when I have.

  20. When it’s time to cook it, brush with more oil, sprinkle with rosemary and grated parmesan and cook at 220ºC until nicely browned on top and the cheese is melted.
Posted in Baking, Cook Once - Eat Twice, Freezing, Two-for-one | Tagged , , , | Comments Off on Two-for-One: Garlic and Rosemary Focaccia and Homemade Pizza bases

Empty-the-freezer week and a weekly menu plan

What do you keep in your freezer?

I’ve been rummaging through ours over the weekend as we’re off on holiday soon and need to finish things up. I have left this far too long! – there are lots of single portions of things, the other halves of various BOGOFs I’ve gone for in the last few months and one or two things that are now unlabelled (I knew I should have bought ‘proper’ freezer labels).

But all that searching through the freezer got me to thinking – what are the top 10 essential things that every busy cook should have in their freezer?

What do you think?
Top of my list would be frozen chopped herbs and spices – especially garlic and ginger (from Waitrose) – they save a whole lot of work and mess. What’s your favourite freezer food?

As a result of all this, the weeks meal plan is a bit of a mongrel meal plan this week – with several old family favourites in it.

Hope you have a good week!

Saucepans

What’s your favourite freezer food?

You may also like:

Ham and Sweetcorn mini-quiches

Ham and Sweetcorn mini-quiches

Another budget menu plan

Another budget menu plan

Chunky Pea and Ham Soup

Chunky Pea and Ham Soup

Posted in Weekly Menu Plan | Comments Off on Empty-the-freezer week and a weekly menu plan

Cinnamon Rolls

You really NEED to make these – yes, you do – because these cinnamon rolls are to die for.

Ok – maybe that is overstating it slightly – but they are SO GOOD that once you’ve tasted their soft, spicy, sticky, deliciousness you will be thanking me for introducing you to them (they are THAT good)!

Cinnamon-rolls2

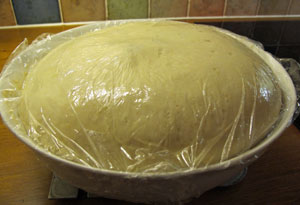
They are also very easy to make – these ones were proved overnight in the fridge before getting them out this morning, letting them rise a little further and then cooking.

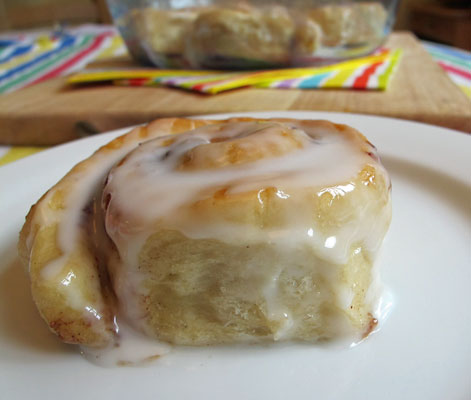
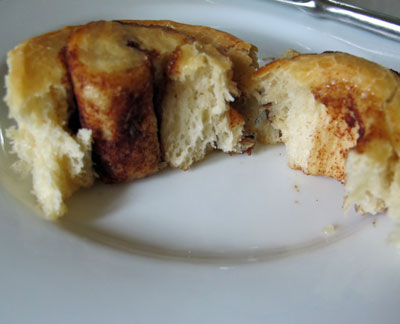
Warm, pillowy cinnamon rolls, fresh from the oven for breakfast – ‘hmmmmmmmm’ is about all I can say.

Cinnamon-Rolls8

This recipe was inspired by a book I read one lazy Sunday afternoon. I forget the title now, but it was not a recipe book – it was a free kindle e-book courtesy of Amazon whispernet, all about strong, American, pioneering women living on the frontier. Their answer to their troubles seemed to be to bake cinnamon rolls. The delicious scent of cinnamon rolls was (virtually) always wafting through the homestead – Cinnamon rolls that always turned out warm, soft and pillowy (their words, not mine). They sounded pretty darn irresistible.

So the search for a soft, pillow-y Cinnamon Roll recipe was on.

Cinnamon-Rolls6

I have to be honest, it has taken a few tries – I wasn’t entirely sure what I was aiming for at the start but was illogically quite sure I’ld know if I found it – and Yup, I did.

It seems a crime not to share the recipe as they are everything promised – fluffy and soft dough, which is warm and melt-in-the-mouth straight from the oven – and most definitely pillow-y.

I started with a similar dough to the one I used in the Milk and Honey Rolls, but added more honey and some butter to make the crumb finer. It’s worth using Premium Bread Flour as it really does seem to make a difference when bread making if you use a high quality flour. I tried adding sultanas to the first batch – having been confused I think by the cinnamon swirls that we get in the UK – but then I realised that they probably didn’t get too many sultanas out in the Wild West.

Cinnamon-rolls4

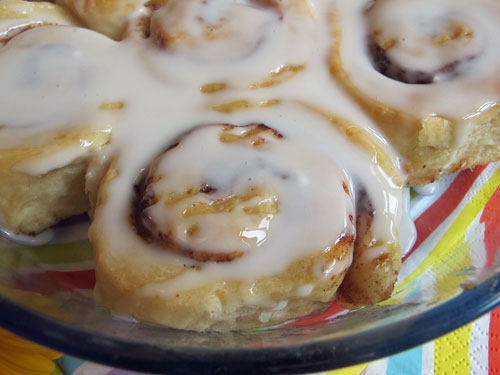
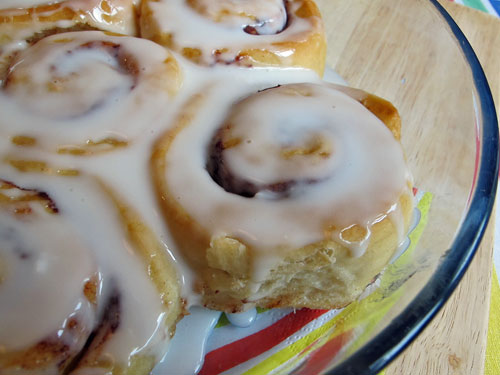
These rolls are tasty and sweet enough to eat on their own, although you can go the extra step and add an icing sugar glaze to them if you wish – I think you should.
Make sure there is enough glaze to drizzle everywhere, and only top them just before eating.

Cinnamon-Rolls5

These were perfect food for brunch. They’ld also be great for picnics – if you glaze them beforehand they might be a little sticky to pack – but they are so good to eat that you’re not going to be able to leave them behind!

So I’m going to link them up to the Four Seasons Food blog challenge hosted by Delicieux and Chezfoti. This month’s theme is Picnic Food – lets now hope we get the weather for picnics. Or you can always make a batch of these to console yourself with as you eat inside staring out at the pouring rain!

Four Seasons Food

Cinnamon Rolls

(Makes 12)

Cinnamon-Rolls6

Ingredients

    For the Rolls:

  • 350g strong white flour
  • 1 packet quick dried yeast
  • ½ teaspoon salt
  • 100 mls water
  • 2 dessertspoons honey
  • 15g butter, chopped small
  • About 120mls cold milk
  • 1 egg


  • For the Filling:

  • 50g butter, melted
  • 2 tablespoons caster sugar
  • 1 tablespoon ground cinnamon


  • For the Icing:

  • 150g icing sugar
  • 2 tablespoons milk
  • A few drops of vanilla extract

Directions

  1. If you have a bread maker: the best way I’ve found to make the dough is to put all the ingredients into the bread maker on the make dough setting (I used pizza dough setting). I just leave the dough in there for an hour or two after the programme has finished and come back to find that its risen nicely and you can get on with making them
  2. If you don’t have a bread maker: Put the flour, salt and yeast into a large bowl and make a well in the center
  3. Put 100mls of just boiled water into a measuring jug. Add the butter and honey and stir until all dissolved. Add 120mls of cold milk. The liquid should be hand-hot (check before using as you don’t want to overheat the yeast)
  4. Pour the liquid into the flour and stir, gradually mixing everything together. Leave to stand for 5 minutes
  5. Knead the dough on a floured board for 5 – 10 minutes until smooth and elastic. Try not to add too much more flour. Place in a lightly oiled bowl, covered with cling film or a tea towel, for about 60 – 90 minutes until doubled in size
  6. Make the Filling: Soften the butter in a bowl and mix in the caster sugar and cinnamon
  7. Turn the dough out onto the board, knock the air out and roll into a rectangle about 25cm by 20cm
  8. Cinnamon-dough
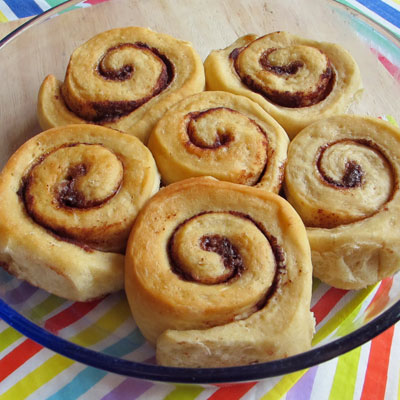
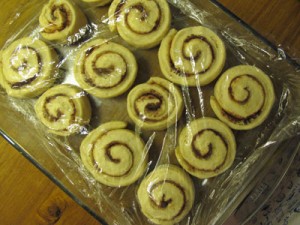
Spread the cinnamon paste all over the dough, making sure you go right up to the edges. Roll up the dough tightly, and then cut the sausage into 12 equal slices. Arrange – swirl side up – in a greased baking tray (I used one 22cm x 30cm). Cover with cling film and leave the rolls in a warm place for 60 – 90 minutes until doubled in size.
  9. Heat oven to 190ºC. Place a baking tray filled with a little water in the bottom of the oven before baking the rolls for about 25 minutes. Cover them with tinfoil at about 15 minutes so they don’t become too browned and crusty
  10. Cinnamon-rolls3They are deliciously warm, melting and irresistible straight out of the oven – if you have any left to ice then…
  11. Make the icing: Mix together the icing sugar, milk and one or two drops of vanilla extract. Just before eating, pour all over the rolls making sure it oozes into all the swirls / cracks / fissures
  12. Other recipes have suggested that these last 4 – 5 days in an airtight container – I challenge you to keep your hands off them for long enough to find out HOW long they last!
Posted in Baking | Tagged , , , | 2 Comments

£25 Weekly Menu Plan for five weekday meals

Do you like watching cooking programmes on TV?

You may remember a programme called ‘Economy Gastronomy’ which was on (in the UK) a few years ago.

It was a series which looked at ‘ordinary’ people who were spending too much money on their food shopping. Two cooks (Allegra McEvedy and Paul Merrett) taught them how to menu plan / budget / cook with impressive cost-cutting results.

I was especially impressed by one family who – as I remember – were spending about £17,000 on food per year! – largely due to eating too many ready-made convenience foods – and they managed to cut their expenses drastically.

Now we don’t spend nearly that amount, but whilst I do try to keep an eye on costs I am aware that we could do better – and in these credit-crunch times that would be no bad thing.

Fired into action by the Live Below the Line challenge, I have been looking much more carefully at food costs – and you may have seen a couple of weeks menu plans that I put together for around £20 for 5 meals for 4.

What has struck me most is that despite radically reducing our weekly budget, the family don’t seem to have noticed a drop in quality of the meals!

5-pounds

I don’t claim to be an expert on cost counting, but I have learnt some interesting things to help cut costs, which I thought I’ld share.

  • Plan rigidly – and stick to your plan – yes, REALLY stick to your plan. The aim should be to abolish those expensive last minute dashes to the supermarket to buy food when you’re in a hurry.

  • Make a Shopping list and stick to it – although you are allowed to add things which are on offer and you usually use!

  • Online shopping: use comparison sites (such as mysupermarket.co.uk), and use the box (in the top right-hand corner) which states how the products you are being shown are ordered. Select the option of ‘Price per unit (low to high)’. You may – like me – be very surprised at the cheaper options you find.

  • Try a cheaper brand. A few weeks ago I was ranting about the enormous variation in the price of tinned tomatoes – 31p to £1.19 for 400g chopped tomatoes. I bought one of each to compare – and, yes, there was a difference, but in my view – if I’m adding a tin of tomatoes to a casserole – the difference that I could detect was not worth the price hike.

  • Estimate portion sizes as exactly as you can. We’ve had far fewer leftovers since I started weighing out the amount of pasta / rice / whatever before cooking. For help with this the Love Food Hate Waste website has some useful calculators.

  • Plan to use leftovers. There are a lot of BOGOFs and offer prices if you buy in bulk, encouraging us all to buy more than we need – so cook more than you need and save for later, or serve up again in a different guise. Just remember, if you are planning to use some of what you’ve cooked tomorrow, take it out of the pot before serving it up to your family!

  • Try different foods. I’ve discovered that I can serve up a vegetarian meal to the troops without anyone demanding their red meat! And yes, we do all like lentils, and the Pork Goulash which we’ve just had (made with Pork Cheeks at £4.49 a kilo) was so delicious I’m going to have to tell you about it some time soon.


– Do you have any other tips?

Saucepans

So this week I’m back to budgeting. The £20 menus were fine but at that cost it is difficult to include much meat. My husband is a true-blue-dyed-in-the-wool meat-eater so if we have too many vegetarian recipes he starts to mutter, so this week I’ve not been quite so strict and aimed for £25.

Do you have any favourite budget recipes?

Posted in Budget Meals, Weekly Menu Plan | 5 Comments

Happy Fathers Day!!

Posted in Baking | Tagged , | Comments Off on Happy Fathers Day!!

Weekly menu plan

If it’s true that time seems to go faster as you get older then I must be about 102.
I mean – where did last week go?

At least the weather has cheered up – we have now had the third day of sunny weather this summer in our part of the UK (yes, I am counting). Hopefully we’ll have a few more before we hit Midsummers day at the end of the month.

Three days does not a summer make, but the weekend was fab and we got out on the water in the kayaks. Which meant that I took note when I read that 10th June is apparently the anniversary of the very first time that the SOS morse-code signal was used in an emergency when a liner was sinking off the coast of the Azores in 1909.
Fortunately we had a great time in the kayaks and didn’t have to call anyone for help.

But after a lovely weekend, it’s back to reality – and menu planning.

Last weeks menu plan survived relatively intact. Salmon with Orange and Watercress was declared delicious, and I finally managed to make the Peaches in Raspberry Sauce.

So this week…

You may also like:

Living Below the line?

Living Below the line?

Creamy Chicken and Tomato Pasta

Creamy Chicken and Tomato Pasta

Posted in Weekly Menu Plan | 2 Comments

Salmon with orange and watercress sauce

Salmon fillet is one of those foods that we all turn to for summer entertaining. Or – particularly when its on offer in the shops, as it is now – for quick suppers at home.

This is a really quick, easy, elegant recipe – just right for summer, and great for entertaining friends – especially on those evenings when you can’t leave work till late, your friends are coming round at 8, AND you have to pick up the children AND go to the shops to buy food BEFORE getting home and turning the oven on. It takes about 20 minutes to make – or if you use the microwave it can take under 10.

Alternatively, you could always make it ahead and eat it cold.

And if you’re still not sold on this idea – both salmon and watercress are on offer at Sainsburys at the moment – what more can I say?!

Orange-and-watercress2

Salmon with orange and watercress sauce

(Serves 4)

Scottish-Trout-in-watercress-sauce

Ingredients

  • 4 salmon fillets
  • a little butter
  • 1 orange
  • 200g tub half fat creme fraiche
  • 75g bag of watercress
  • 1 teasp cornflour

Directions

  1. Wash and pat dry the salmon fillets and place in a roasting dish

  2. Dot with butter and pour over the juice of 1 orange

  3. Bake in the oven at 190°C for about 15-20 minutes until the fillet are cooked through

  4. (If you’re really in a hurry you can cook them in the microwave. I tend to cook for 3 minutes and then check – if not cooked through, heat again for another minute and check again – and keep heating a minute at a time until done)

  5. Meanwhile wash and drain the watercress. Remove the thick stalks and put leaves into the food processor with the tub of creme fraiche – blitz until the watercress is chopped small

  6. When the salmon is cooked remove from the oven and drain off the juices

  7. In a bowl mix the cornflour with a small amount of the fish juices. Gradually mix in all the juices stirring as you go to prevent lumps forming

  8. Add to the creme fraiche mixture in a saucepan and heat gently until the sauce is warmed through and a little thickened. Season with salt and pepper and serve with the salmon fillets.

Salmon-in-watercress-sauce3

Posted in Main Course, Quick Meals | Tagged , , , | Comments Off on Salmon with orange and watercress sauce

Grilled Peaches with Raspberry Sauce

Finally!

I’ve been meaning to make these peaches for a couple of weeks now, but somehow not quite managing to.

Which is a shame as it’s a really quick simple recipe which everyone loves – even my children who aren’t great fruit eaters.

It is a really really quick recipe which is a good way of serving those hard ‘ripen-at-home’ peaches that never seem to quite make it to delicious juicy peachy loveliness however long you sit them on the window sill!

And if I write any morer I’m in danger of talking for longer than it takes to make, so…

Peaches in Raspberry Sauce

(Serves 4)
Grilled_Peaches_1

Ingredients

  • 4 peaches – halved with stone removed
  • 1/2 tub Greek yoghurt with honey (I used Rachels)
  • Approximately 2 tablespoons of soft brown sugar
  • 150 – 200g raspberries (I often use frozen raspberries

Directions

  1. Grilled_Peaches4Wash, halve and stone the peaches.

  2. Grilled_Peaches5Dip the cut half of the peaches into the sugar

  3. Grilled_Peaches6Arrange in a roasting tray

  4. Grilled_Peaches8Mash the raspberries into the yoghurt and add about a tablespoon of soft brown sugar to taste

  5. Grilled_Peaches7Just before you want to eat grill the peaches under a medium grilll for about 5 minutes until soft and the sugar is bubbling on top

  6. Enjoy!
Posted in Desserts, Quick Meals | Tagged , , | Comments Off on Grilled Peaches with Raspberry Sauce