Carrot Cake Muffins

Today seemed like a day for Cake.

But then there aren’t many days – or times of the day when cake doesn’t suit, are there? Coffee, teatime, dessert – all perfect cake eating opportunities. Call it a muffin and you can even eat cake for breakfast without anyone looking twice!

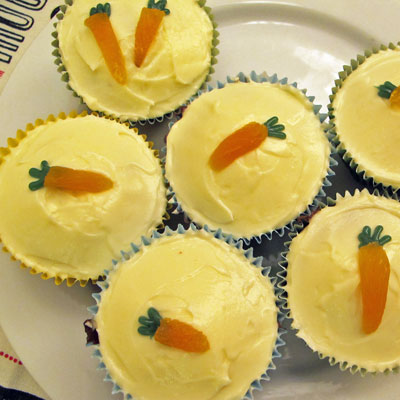
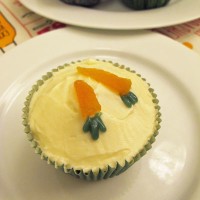
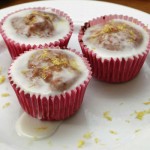
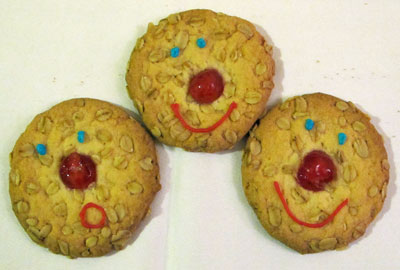
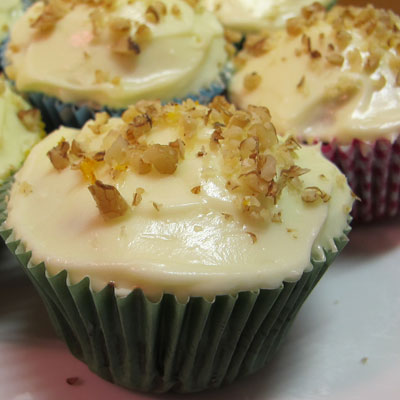
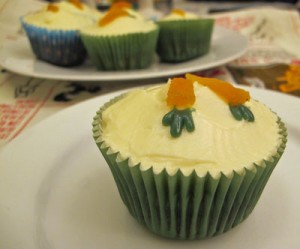
These are carrot muffins. If you leave the icing off, you may even be able to describe them as healthy – lower than they could be in fat (milk and oil instead of butter), bursting with lovely vegetables (lots of carrots) and lots of fibre (made with part Oatbran and part flour).

Carrot-muffins4

But I’m never sure that describing a cake as ‘healthy’ is much of an advert for it!

Eating cakes that are too blatantly low-fat, healthy, good-for-you cakes leaves me feeling ever-so-slightly cheated. I mean, what’s the point? Cake really ought to be: indulgent, creamy, sweet, sticky, gooey….. you get the idea.

Carrot-muffins5

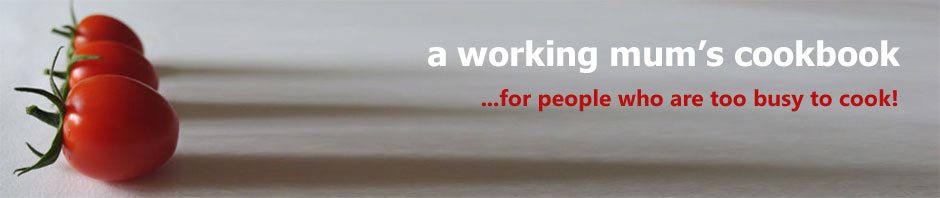
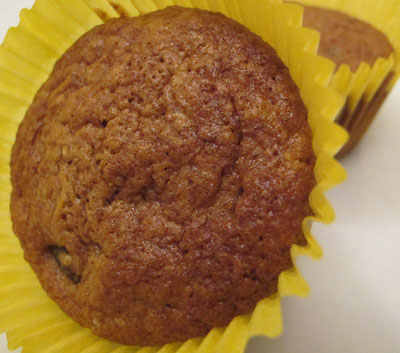
So let me reassure you – these are lovely moist carrot cakes with a delicious hint of orange and topped with gorgeous cream cheese icing. They certainly fulfilled all my expectations of a cake eating experience. Lets not dwell on whether the cake is really low fat or good for you, in case it spoils the enjoyment of what should be a treat!

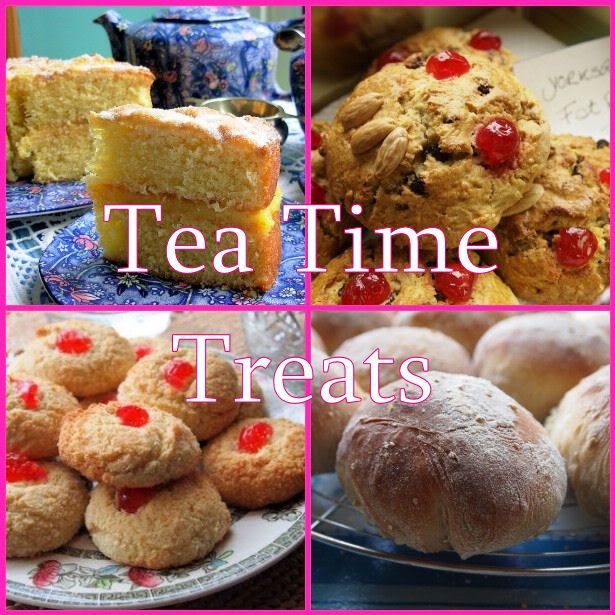
As such I’ll be sending them across to the April Tea-time Treats run by Kate at What Kate baked (this month), and co-hosted by Karen of Lavender and Lovage.

This recipe grew from wondering what to do with a packet of oatbran that my husband had bought one day by mistake when looking for porridge oats, and was inspired by two recipes. The orange flavouring is a delicious touch I hadn’t tried before and was inspired by this article in the Guardian about how to make perfect carrot cake.

Carrot Cake Muffins

(Makes 10)

CARROT-MUFFINS9

Ingredients

  • 50g oatbran
  • 50 mls milk
  • 100g self raising flour
  • 100g soft brown sugar
  • 1½ teasp baking powder
  • ¾ teaspoon ground cinnamon
  • pinch of salt
  • 50 mls oil
  • 2 eggs
  • zest of ½ a large orange
  • few drops of vanilla extract
  • 130g finely grated carrot
  • 100g sultanas

  • For the icing:

  • 75g butter
  • 150g icing sugar
  • 100g cream cheese
  • few drops vanilla extract

Directions

  1. Place milk and oatbran in a bowl together and leave for a few minutes for the oatbran to absorb the liquid
  2. Put flour, sugar, baking powder, cinnamon and salt into a bowl
  3. Measure out the grated carrot and sultanas
  4. Put oil into a jug and add the eggs. Beat until eggs just incorporated
  5. Add to the dry ingredients with the orange zest and vanilla and mix well until a uniform consistency.
  6. Spoon the mixture into a lined muffin tray – each needs to be about ¾ full
  7. Bake at 180ºC for about 35 minutes until browned on top
  8. Cool in the tray
  9. Make the Icing: Soften the butter and cream together with the sugar and the soft cream cheese. Add vanilla to taste. Ice the muffins when cool. Decorate as you wish – dried apricots and chives / green writing icing for carrots.

Carrot-muffins6

Posted in Baking | Tagged , , | 2 Comments

The week of cake

No, this isn’t some new ‘week’ that you haven’t heard about till now. I’ve decided that I will definitely take part in the Live below the line challenge next week and try to live on just £5 for the week so I’m ‘preparing’ for it this week. (I’ll let you know how I get on here).

As such next week promises to be fairly dull from the culinary angle as I’ll probably have to subsist on beans, flatbreads and lentils (not my most exciting menu). So this week, in preparation I’m emphasizing the good things in kitchen life: cake, pudding, ice-cream – you get the picture!

So this weeks menu:

You may also like:

Chocolate Brownie Cupcakes with ice-cream

Lemon Tarts with Raspberry puree

Lemon Tarts with Raspberry puree

Melting Moments for Red Nose Day

Melting Moments for Red Nose Day

Posted in Baking, Desserts, Weekly Menu Plan | Tagged | Comments Off on The week of cake

£20 menu – a success?

You may have seen that last week, prompted by the Live Below the Line challenge to live on pound a day, I put together a weeks menu plan for £20 – a pound a head every night for the five weekday evenings.

Here’s how it went:

Monday : Mini quiches, carrots, cabbage and new potatoes  £3.39
Everyone always likes mini-quiches so they were an easy win.
Family rating: ★★★★★
Preparation time: 90 minutes

Tuesday: Mushroom Carbonara with salad £4.02
This turned into Mushroom Carbonara, mainly at the request of my son who wanted to help cook it.
Family rating: ★★★★ (but then if you call anything ‘carbonara’ they like it)
Preparation time: 30 minutes

Wednesday: Sausage casserole with mashed potatoes £4.11
Easy, filling and always popular.
Family rating: ★★★★
Preparation time: 40 minutes

Thursday: (was supposed to be) Tuna fishcakes with vegetables
…but in the end we were all out for supper.

Friday: Fritatta Courgette Fritters with salad £4.68
courgettefrittersThis wasn’t so successful as I decided at last moment to make Courgette Fritters as they sounded tastier. And they were, but they were also over-budget, the recipe made LOTS, and they were a bit like marmite (those who loved them really, really loved them…)
Family rating: Varied from to ★★★★★
Preparation time: 35 minutes

So overall, not bad I thought – £16.20 for 4 meals.

Putting together a meal for a pound a head is difficult with today’s prices (I can’t imagine how difficult it will be trying to live on £1 for THREE meals). I have got in a bit of a rut with the products I buy, but trying to stick to a budget forced me to look for cheaper options – either different brands or different ways of processing (eg frozen vs fresh). Interestingly, the rest of the family don’t seem to have noticed a great difference in quality using some cheaper brands, so that’s a change that will stay!


Saucepans

Anyway – this week’s menu planning is back to ‘normal’…

Have a good week!

If you want more menu planning ideas have a look at all the other lovely menus at Mrs M’s Meal Planning Monday

You may also like:

Chicken and Leek Soup

Chicken and Leek Soup

Milk and Honey Bread Rolls

Milk and Honey Bread Rolls

Posted in Weekly Menu Plan | 4 Comments

Ham and Sweetcorn Mini-Quiches

This recipe is – I admit – somewhat out of character for me.

The problem is that for someone (like me) that likes to see great results in the kitchen with the minimum of time and effort (certainly on a weekday), it takes just a bit too long. But these tasty little mini-quiches are so popular with the family that I do knuckle down from time to time to make them. On top of that they are simple and a good way to use up leftovers or create supper out of thin air when the fridge is apparently empty. And – of course – they are cheap.

4pounds3

And cheap is what I’m aiming for during this week of budget friendly meals – I worked out that these cost £2.50 for 36 (assuming you use any left over ingredients in other things), so I guess it depends how many you actually eat as to what the actual cost of the meal is. Even in our hungry household we had plenty left over for lunch the next day.

miniquches4

As I said they’re not as time-friendly as I would usually look for on a weekday evening. These probably took me about 1 ½ hours to make start to finish, but that included letting the pastry rest in the fridge. If you made that the evening before it would considerably reduce the time needed.

If you don’t have ham and sweetcorn then you could always try some other combinations.

Ham and Sweetcorn Mini-quiches

Makes 36 – and cost me £2.50

Ham and sweetcorn mini-quiches

Ingredients

For the pastry (or buy ready-made shortcrust):

  • 350g plain flour (28p)
  • 175g butter or margarine (margarine 48p)
  • approx 4 tablespoons cold water

For the filling:

  • Approx 2 slices cooked ham (80p)
  • About a 1/4 tin of sweetcorn (8p)
  • 60g finely grated cheddar (36p)
  • 2 eggs (I bought free-range so they cost 42p)
  • 175 mls milk (8p)
  • salt and pepper

Directions

  1. Make the pastry – put flour into food processor with a pinch of salt, and whiz for a couple of seconds. Add the fat chopped small and whizz for a few more seconds until the fat is incorporated as fine breadcrumbs.
  2. With the motor going, add 4-5 tablespoons of cold water until the mixture starts to stick together. Remove from food processor and form into a ball – cover with cling-film and leave in fridge for about half an hour.

  3. Meanwhile grease a 12 hole bun-tray (3 if you have them) thickly or the quiches stick, and heat oven to 190°C.
  4. Roll out pastry, cut out 7.5cm rounds with a pastry cutter and place in bun tins.
  5. Chop the ham up small and scatter a few pieces in each quiche and add a few sweetcorn kernels.
  6. Beat the eggs into the milk, season with pepper, and pour a little into each pastry case to within a few mm of the edge (probably about a dessertspoon in each). Scatter over a little grated cheddar and then cook for about 15-20 minutes until the pastry and the cheese are nicely golden.
  7. Scoop them out of the trays with a plastic knife and either eat or leave to cool on wire racks if you’re not eating them straight away.
  8. Serve with coleslaw and new potatoes. They are very more-ish so if you’re planning for leftovers you may do well to hide some before serving up!

As these mini-quiches are cheap and a good way of using up leftovers I’m going to link this to April’s Credit Crunch Munch – a linky run by Fuss Free Flavours and Fab food 4 All, encouraging us to share our money-saving ideas.


Posted in Budget Meals, Main Course | Tagged , , , | 6 Comments

A pound a day? and a weekly menu plan

Could you live on £1 a day?
I’m not sure I could.

In fact when I first heard that I didn’t understand it – what was the £1 to cover? Chocolates? Mid morning snacks? Drinks? – maybe. But ALL my food and drink? Surely not!
But yes – the challenge is to live on £1 a day for all your meals for 5 days.

So where does this figure of £1 come from?
According to the ‘Live Below the Line’ campaign approximately 1.4 billion people worldwide live in extreme poverty – only having an amount of money which equates to a (UK) pound a day for EVERYTHING.

But, (I thought as I read this) surely £1 can buy you so much more in undeveloped countries, can’t it?
Well, No – apparently in the various complex calculations someone has made, they’ve taken this into account too – and have looked at the purchasing power of money in reaching the conclusion that they really do mean one pound a day.

It’s sobering isn’t it?

And challenging.

After all, in our home we probably spend a years worth of pounds-a-day in under a month – and we can easily blow a months allowance on getting a takeaway one evening (which would leave us pretty hungry for the other 29 days!).

4pounds3

£1 seems very difficult to me and I’m going to have to put some serious thought into how I do it. But for this week I thought I would budget for a pound a head for supper for the family – £4 an evening for a family of 4. Although I do usually watch prices, I haven’t previously calculated the total cost of meals including all the individual ingredients – and it all adds up very fast. I’ve found it quite challenging, educational and time-consuming!

So here’s my menu for £20 for 5 evening meals – £19.38 to be precise (it could have been less, but I splurged on some very good sausages that were half price and maybe one or two other things). Calculating meal costs is difficult as there are so many products / shops / offers out there. These are my calculations, based on the prices I got shopping through mysupermarket.co.uk – someone else doing them on a different day would almost certainly get a different answer!

I’ll let you know what the family thought about it all next week (and if they notice a difference!).

Posted in Budget Meals, Main Course, Weekly Menu Plan | Tagged , , | 7 Comments

Lunch in a hurry and Simple-to-make Flatbreads

I hope you had a good Easter?

I post this recipe not because its a really rich indulgent Easter treat, but because it’s a really good make-at-the-last-minute-when-there’s-nothing-in-the-house recipe – as I discovered on Easter Sunday.

We were supposed to be going away for a few days on Sunday so I hadn’t really planned to be making any meals at all as I thought we’ld be on the road. Unfortunately owing to a broken bike rack and the difficulties we then seemed to have trying to fix 4 bikes to the roof of the car with only 3 bike racks, packing took longer than expected. Which is why at 1.00 on Sunday we were still at home with my family looking at me hungrily asking when we could expect to have lunch? It wasn’t a good time to be reminded that the shops are shut on Easter Sunday.

At which point I remembered Flatbreads – very simple to make, almost as quick as driving to the supermarket to then come home again because it’s closed, and actually very good to eat. It took me about half an hour but I had lunch on the table before the bikes were on the car…

This is based on Hugh Fearnley-Whittingstalls recipe from River Cottage Everyday which I found referenced here but I guess flat-breads have been around for centuries. I’ve changed things a little.

Flatbreads2

How I made

Flatbread Pizzas

  1. Mix together 300g strong white bread flour (or you can use plain flour), 1 teaspoon of salt and 180mls warm water (I left out the oil). Some people also add various herbs and spices at this point.
  2. Leave to stand for 5 minutes.
  3. Knead dough gently on a floured board for about 5 minutes until it feels smooth and elastic – leave to rest for about 15 minutes.
  4. Cut into about 8 equal portions and roll each out into a circular shape.
  5. Heat your grill to high. Place a flatbread on a baking tray under the grill and cook for a minute or two until it starts to puff up and brown. Flip over and cook on the other side. You can’t afford to stop watching them as they only take a minute or two.

    (The recipe does suggest cooking them in a large cast iron frying pan, but I found that the loose flour started to singe and smoke so preferred grilling them).

  6. Flatbreads4

  7. Wrap in a clean tea towel to keep warm whilst you cook the others.
  8. Serve with hummus, grated cheese, ham – just about anything.
  9. OR for Flatbread Pizzas:

    • Grill the flatbread on one side and turn over.
    • We spread about a teaspoon of tomato puree thinly over the uncooked side and scattered with grated mozarella, though you can vary it as you wish.
    • Return to the grill for a minute or two until the flat bread is browned and the cheese is melted.
    • Take your pictures quickly or they’ll be nothing left to photograph!

Flatbread-pizza2

Posted in Baking | Tagged , | 1 Comment

Pear Tarte Tatin

Considering that Tarte Tatin apparently started life as an accident it is one of the most amazingly delicious desserts that you can make!

It was apparently first made by accident by one of the Tatin sisters at their hotel in France. The guests loved the accidental result and Tarte Tatin has been around ever since.

Reading that story I was fooled into thinking that it must be easy to make (it started out as an accident so hard can it really be?), but now I’ve made several versions I realise I was wrong! But it is always totally delicious! So if you haven’t tried it before, why not give it a go? This was inspired by Lorraine Pascales recipe for Pear Tarte Tatin, but has evolved since so I’ve given the recipe I used below.

Pear-Tarte-Tatin-steps

I am going to link this up to March’s Tea-time Treats which is run by both Karen at Lavender and Lovage (this month), and co-hosted by Kate at What Kate Baked. This months challenge is anything French so hopefully this should fit right in.

Pear Tarte Tatin

(Serves 8)

Pear-Tarte-Tatin5a

Ingredients

  • 5-6 really firm pears
  • 60g unsalted butter
  • 110g caster sugar
  • Zest of half a lemon
  • Zest of half a small orange
  • About an 1/8th of a teaspoon of ground cinnamon or 3-4 pinches
  • A sheet of ready rolled puff pastry

Method

  1. Peel the pears carefully using a peeler. Halve and core – or you can try quarters if you like. I tried that last time and was able to pack in more fruit (see the photo below).
  2. Melt the butter with the sugar in a large thick bottomed pan over a medium heat. You need to use a pan which can also go into the oven.
  3. When dissolved, continue bubbling over the heat until it darkens and caramelises. Swirl the mixture round the pan from time to time to ensure it cooks evenly.
  4. Place the pear pieces in the caramel. I use a spoon for this. Caramel can get really REALLY hot and can burn badly so please don’t touch or taste it.
  5. Pear-Tarte-Tatin-prep7Let the pears bubble away over a medium heat for about 15 minutes or so, turning them carefully occasionally. They will release a lot of juice diluting the caramel but it will gradually reduce and the mixture should end up a gooey rich amber colour.
  6. Meanwhile – turn the oven on to 200°C.
  7. Place the pastry sheet on a floured board and roll out so it is a little thinner and wider. Using the lid of your pan as a guide, cut out a pastry circle that is a couple of centimeters wider all the way round. Place on a plate and put in fridge until you need it.
  8. When the pears are done, take off the heat and let stand for a few minutes. Make sure they are arranged rounded side down (you will be turning the tart upside down to serve). Sprinkle over the cinnamon and the zests.
  9. Then cover with the pastry circle tucking the edges in a little way around the pears. I use the end of a spoon handle for this so as not to get burned
  10. Pierce the pastry with a sharp knife 2-3 times and then cook for about 30 minutes until the pastry is crisp and well browned. Take out of the oven and leave to stand for about 15 minutes to cool a little.
  11. To tip it out, place a plate carefully over the pan. Put on oven gloves to protect yourself from the juices that may leak out, and holding the plate firmly on top of the pan, flip them over quickly so the tart drops on to the plate
  12. Stand back and admire!
  13. Serve with vanilla ice-cream.
  14. Pear-Tarte-Tatin14

Posted in Desserts | Tagged , , | Comments Off on Pear Tarte Tatin

Spatchcock Chicken and a Weekly Menu plan

March appears to be disappearing at a rush with Palm Sunday next weekend. Then it’s Easter and everyone will be on holiday for a week or two!

Last weeks menu had its high and lows. Spatchcock chicken was a definite success, so much so that we had it again for friends over the weekend. Roast chicken in under an hour is brilliant – and meant that we could start cooking lunch late after church and still serve proper roast dinner to friends at 1.00! I’ll tell you more about how it went below.

The Thai Green fish curry wasn’t such a success (although not a disaster either) – probably because I’m still having problems getting my family to eat fish (don’t they know what’s good for them?!)

So here is this weeks menu – yes, more fish (they will learn!) And this week I’m going to make a definite effort to add more fruit…


Roast Spatchcock Chicken

(Serves 4)
(Start to finish time – probably around an hour)
Spatchcock-chicken-prep5

Directions

There are numerous websites where you can watch videos on how to spatchcock a chicken. I found this one very clear and easy to follow. The idea is to flatten the chicken out so it is the same thickness all over and cooks quicker.

So, having watched the videos I got out my kitchen scissors and this is how it went:

  1. Spatchcock-chicken-prepPlaced chicken on a board breast side down with tail end facing.
  2. Spatchcock-chicken-prep2With a pair of fairly sturdy kitchen scissors, cut along the right hand side of the backbone cutting through the ribs to the other end. It took a bit of brute force to crack through the ribs.
    Then cut along the other side of the backbone to remove it completely.
  3. Turned the chicken over, spreading it open and pressed down on the breast bone in the middle to flatten it completely to try and end up with a chicken that is the same thickness all over.
    Again this seems to take a fair amount of pressure (and more bones cracking) to do it effectively.
  4. Spatchcock-chicken-prep3I skewered the chicken to keep it together and flat, but you don’t necessarily need to do this for roasting it.
  5. Then:

  6. Peel 4 large potatoes, thickly slice (about 1cm thickness) and place in roasting tray. Peel and coarsely chop 4 medium carrots and an onion. Season and scatter over some sprigs of thyme and rosemary. Add a tablespoon or two of oil and give it a stir so all are evenly covered. Spread out in an even layer on the bottom of the tray.
  7. Place the chicken on top of the vegetables and cover the breast with strips of bacon if you wish.
  8. This took about 50 minutes roasting in the oven at 200ºC. Although obviously it will depend on the size of your chicken and you need to check its properly cooked before eating.
  9. The potatoes should be cooked in the same time, but I found they benefited from 10 minutes or so at the top of a hot oven whilst carving the chicken, to give them a chance to crisp up a little.

Just remember to let it stop steaming before taking photos!
Spatchcock-chicken-prep6

Posted in Main Course, Weekly Menu Plan | Tagged | 2 Comments

Melting Moments for Red Nose Day

Happy Red Nose Day!

I made these to celebrate – the only problem is that I made them last night and most of them have already gone.

Melting Moments were one of the first things I learned to make in my Cookery lessons at school – in amongst the lessons on how to make a roux and rolling out the flaky pastry. You can guess which recipes were taken home to make again (!) and these were a favourite when I was younger.

I hadn’t made them for ages but now I’ve tasted them again I can’t really remember why not. Watching them disappear it’s clear that the family were happy. They really do live up to their name and just melt in the mouth – especially if eaten still warm (but not straight out of the oven as they need to harden up a little). Maybe it was something to do with the fact that in the original recipe they were rolled in crushed cornflakes and somehow that seemed more like breakfast to me than biscuits. Whatever, rolled oats are just right.

They are very simple to make so you could still bake a few to munch whilst cheering everyone on. Have a good day!

Melting Moments

(Makes about 20)

Melting-Moments3

Ingredients

  • 4 oz (115g) softened butter
  • 3 oz (85g) caster sugar
  • 1 egg yolk
  • a few drops vanilla extract
  • 4 oz (115g) self-raising flour
  • Jumbo rolled oats
  • Glace cherries to decorate

Directions

  1. Cream the butter and sugar together

  2. Beat in the egg yolk and flavour with the vanilla

  3. Stir in the flour

  4. Roll a small amount into a ball, roll in rolled oats and flatten slightly. Place on a sheet of baking parchment on a baking tray. Decorate with half cherries for red noses and bake at 180&#176C. The recipe says 15-20 minutes. I cooked these for 17 minutes and, even though they were delicious, I think I’ll try cooking them for a minute or two less next time.

  5. Let them harden slightly before transferring to a wire rack to cool

Melting-Moments2

Posted in Baking | Tagged | Comments Off on Melting Moments for Red Nose Day

Weekly Menu Plan – Menu planning Monday 11th March

Another week and another menu!
Last week ran away with me a little so although I did manage to plan our weeks meals ahead I didn’t manage to post.

The best meals were a lovely, warming Lancashire Hotpot, and a Pea and Parmesan risotto. Also we had a delicious Pear Tarte Tatin for Mothers Day that I will tell you about some time – that one disappeared very fast so I will need an excuse to make another very soon.

This week is somewhat less busy than last – although I guess in a week which contains Red Nose Day, just about anything might happen!

Our weeks menu plan is:


Posted in Main Course, Weekly Menu Plan | 2 Comments