Two-for-One: Bacon and Tomato pasta sauce with creme fraiche and Chicken Cacciatore

Everyone needs a good standby pasta sauce. Easy and quick to make – ideally from store cupboard ingredients. This one fits the bill beautifully.

It was inspired by a supper we had one holiday at a small creperie in Normandy. French galettes filled with a delicious sauce – lots of onions, lardons, rich tomatoes and crème fraiche stirred in to give it a rich smooth flavor. (Mmmm – roll on summer holidays!)

Even better – it takes less than 20 minutes to make, even when I’m tired and slow at the end of a long day.

Bacon-and-Tomato-Pasta-sauce12

And if you want another quick meal tomorrow – make a little extra and try Chicken Cacciatore (see below).

OR you can always use the extra tomato sauce to serve up with Lamb Meatballs with Feta.

Planning to have leftovers is one of my favourite ways of saving cooking time during the week.

Bacon and Tomato Pasta sauce with creme fraiche

(Serves 4 of us)
Bacon-and-Tomato-Pasta-Sauce3

Ingredients

  • 1 Pack of bacon lardons or pack of bacon – cut into strips
  • 3 medium onions, sliced
  • 2 tins of chopped tomatoes in juice
  • Approx 10 fresh basil leaves
  • 100g half-fat crème fraiche with extra to serve
  • Grated cheddar cheese to serve
  • Pasta for 4

(If you want to make chicken cacciatore the next day, add another onion and another tin of chopped tomatoes to the sauce. When cooked, remove about a third of the sauce before adding the creme fraiche, and keep it in the fridge for the next day – or freeze.)

Method

  1. Fry bacon and onions in a little oil until onions are soft.
  2. Add the tins of chopped tomatoes and simmer for ~10 minutes uncovered until sauce has thickened a little.
  3. Add the basil leaves, torn into pieces.
  4. (If making extra for tomorrow then reserve about a third of the sauce at this stage.)
  5. Season with black pepper (the bacon is usually salty enough), and stir in 100g crème fraiche.
  6. Serve with cooked pasta and grated cheese

Cooking-should-be-fun

Posted in Budget Meals, Cook Once - Eat Twice, Main Course, Quick Meals, Two-for-one | Tagged , , , , | Comments Off on Two-for-One: Bacon and Tomato pasta sauce with creme fraiche and Chicken Cacciatore

Two-for-One – Cook Once – Eat Twice : Chilli-con-Carne

Click on the different days to see how it all changes! (- it took me a while to make it work!)

One of the best ways I find to save time during the week is to cook extra one night to use the next evening also. Of course, what you don’t want is for the children to take one look at it the second time around and chorus “Oh no, not this again!” (even though they liked it the first time). So the trick is that you need to make it look different!

This Chilli con carne is simple enough to cook double quantities one evening and turn into something different quite simply for the next day – such as…

…Quick Meal Ideas for Day Two:

  1. Chilli served traditionally with rice.
  2. Chilli with tortilla crisps and melted cheese: Heat the cooked chilli in the oven till piping hot. Then cover with coarsely crushed tortilla crisps, scatter with grated cheddar cheese and heat under the grill until the cheese is melted and bubbling on top (= our family favourite).
  3. Chilli wraps: Heat chilli in a pan / microwave until hot and serve with warmed tortilla wraps, sour cream, shredded lettuce and chopped tomatoes.
  4. Chilli Tortillas: For a slightly different look – see this recipe which can be made just as easily with leftover chilli.
  5. Or freeze the other half to have chilli another day.

I never really used to like Chilli until I discovered that you don’t need to include kidney beans to call it chilli. I love the way they look – those purple little beans somehow make the chilli look more satisfying, but in reality they always seem rather tasteless and disappointing. So it was good to discover that the original chillis didn’t have beans in them. I had always thought that chilli without beans was – well – spaghetti bolognaise or something similar. But apparently not.

In actual fact it seems that Chillis-in-the-olden-days didn’t necessarily have tomatoes in them either – but as I rather like the tomato-ey taste I’ve decided to ignore this – let’s not take this passion for authenticity too far!

Authentic or not – this recipe is tasty (delicious says my husband in a moment of praise), easy to make, doesn’t have a list of ingredients that goes onto the second page and is quick to put together. And of course, you can add kidney beans if you want!

I’ve given here double quantities so you can eat for two evenings with different looks (see the picture change above!), so remember to halve them if you only want to serve 4. Just remember, if you are going to cook double and eat twice, take out the second nights ‘ration’ before serving up the first night (so it doesn’t get eaten). Chill it quickly and store in the fridge without delay – and of course, it needs reheating properly the next night.

However you eat it, I hope you enjoy it!

Chilli Con Carne

(Serves 6-8. This is enough for 2 meals for my family)
(Fridge to Table time: About an hour)

Ingredients

  • 2 medium onions, sliced
  • 2 red peppers, washed, deseeded and diced
  • 2 green peppers, washed, deseeded and diced
  • 2 cloves of garlic, crushed
  • Oil
  • 2 x 500g packs of beef mince
  • 2 x 400g cans chopped tomatoes
  • 2 teasp mild chilli powder
  • 2 teasp ground paprika
  • 3 teasp soft brown sugar
  • 3 tablesp red wine vinegar
  • 1 tablesp tomato puree
  • 150 mls beef stock

Method

  1. Heat about a tablespoon of oil in a large pan and fry onions, peppers and garlic over a medium heat until softened.
  2. Meanwhile, in a separate frying pan, fry the mince in a little oil until browned.
  3. Add the chopped tomatoes to the onions and peppers. Mix the last five ingredients together in a bowl and add to vegetables. Add the meat and stock, season and stir well.
  4. Simmer the chilli over a low heat for about half an hour till the sauce thickens. Stir occasionally to keep it from catching.
  5. Serve with rice, salad and garlic bread – or as one of the variations above.
Posted in Cook Once - Eat Twice, Freezing, Main Course, Two-for-one | Tagged , , | Comments Off on Two-for-One – Cook Once – Eat Twice : Chilli-con-Carne

Chocolate Brownie Cupcakes

They say that cooking is a Science. So as my contribution to pushing back the frontiers I decided to do some research into how to create the Perfect Brownies – but not just ordinary Brownies, I wanted to make Brownie Cupcakes.

Now, I have to admit that I have struggled in the past with Brownie recipes. Cooking them in one big baking tin doesn’t seem to get it quite right. Somehow a brownie from the chewy centre is never quite crisp and airy enough and one from the edge of the tray never quite has that essential brownie gooey-ness. But what if you could make individual brownies? As in brownie cupcakes? Surely you should get crunchy edge with fudgy centre all in one piece?

Sounded good to me – so, back to the research.

Step 1: Typing ‘How to make Brownies’ into Google brought up all the well known names on page 1 and I looked through them all to see what the essential ingredients were and if there was some magic formula. Cocoa or not? Caster sugar or brown sugar? etc etc – you get the idea.

Step 2: Quickly decided that if there is a magic ratio of ingredients I couldn’t see it and wrote down a guess as to what might work out.

Step 3: Tried it out. It seemed wise to only make half quantities as this was a trial and my guestimated recipe contained 4 eggs and more chocolate than it seemed reasonable to ruin if it all turned into a disaster. So I started off halving everything, BUT forgot half way down the list and put in the whole amount of the last few ingredients! Ah well – cooked them anyway.

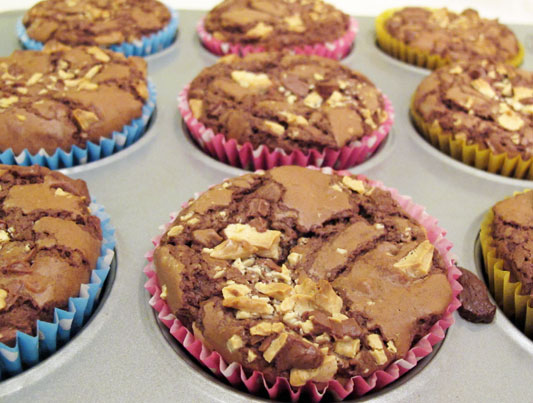
RESULT: Amazingly Delicious! Just the combination of crisp cracked shiny crust with a cake-y outside and slightly fudgy inside that I had been hoping for. The only problem was that the first batch didn’t have quite enough chocolate chips in them so we (of course) had to make another lot!

So – with thanks to all the recipes that appear on page 1 of a Google search for Chocolate Brownie Recipes – and a few tweaks since – here is the recipe for Brownie Cupcakes.

Chocolate Brownie Cupcakes

(Makes 10)
(updated 19/12/12)

Ingredients

  • 100g dark chocolate (I used Bournville)
  • 100g (slightly salted) butter
  • 2 medium free range eggs
  • 75g caster sugar
  • 50g light brown muscovado sugar
  • 120g plain flour
  • 20g cocoa
  • 1 teasp baking powder
  • A few drops of vanilla essence
  • 100g chocolate – a mixture of white and milk chocolate – to make chocolate chips

Method

  1. Melt butter and dark chocolate together in a metal bowl over a pan of boiling water, making sure the water doesn’t touch the bottom of the bowl. When melted let it cool for a few minutes. Pour into a mixing bowl.
  2. Break the eggs into a bowl with both the sugars and the vanilla, and whisk until the mixture has gone significantly paler in colour, is frothy and a little thickened – one of the other recipes suggested this may take 3 – 8 minutes. If you have a mixer or food processor with a whisk attachment and can leave them beating whilst you get on with other things, that’s ideal.
  3. Pour the egg/sugar mixture into the mixing bowl with the chocolate mixture. There should be quite a lot of air in the egg mixture which you don’t really want to lose, so fold the mixtures gently into each other.
  4. Weigh the flour, cocoa and baking powder into a bowl. Sift through a sieve into the chocolate/egg mixture, adding about a third before folding in gently, then another third – and so-one until all is incorporated. Don’t overmix.
  5. Chop the white and milk chocolate into small chips using a sharp knife and add 2/3rds to the brownie mixture, saving the remainder for later.
  6. Line a muffin tray with cupcake cases – fill each ⅔s full with brownie mixture.
  7. Bake the cupcakes at 180°C for 20 minutes. About half way through open the oven door and scatter the remaining chocolate chips over the top of the cakes before returning to the oven to finish cooking.
  8. Take them out at 20 minutes when they should have a shiny cracked crust and not wobble when you shake the tray gently. If they do put them back for another couple of minutes cooking. You can’t test whether they are done or not as you do with cakes with a cocktail stick inserted into cake coming out clean – the brownie mixture will stick to it.
  9. Transfer them to a wire rack to cool straight away – gently as they’re still a little fragile. This is important to stop them cooking and ensure that they keep the goo-ey centre. Alternatively if you prefer the more cake-like variety, leave them in the cupcake tin for 10 minutes or so before transferring out to cool.
  10. Eat them when warm with ice-cream, or they are possibly even nicer the following day when they’ve cooled.

Updated!! (02/02/14) If you find the cupcakes too large, you can make them fairy-cake size – just cook for 14 minutes before cooling on a wire-rack. Chocolate Brownie Fairy-cakes – small, delicious and very more-ish!!


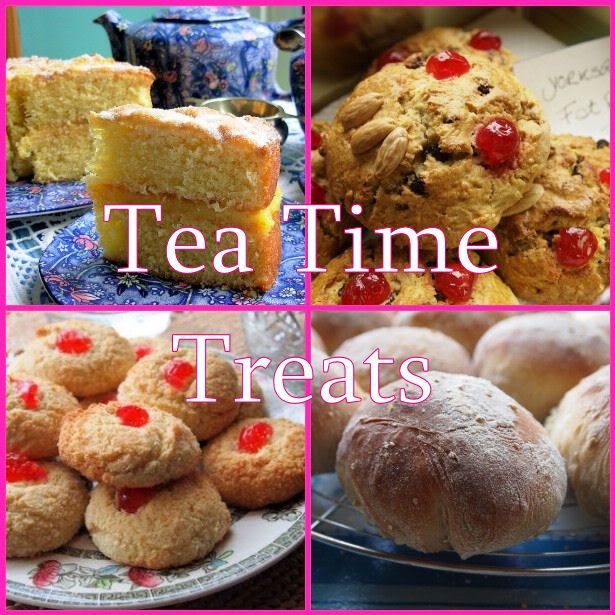
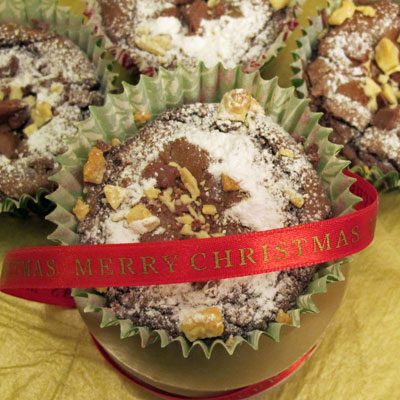
I’m entering these into the December Tea-time Treats link up at What Kate baked co-hosted by Lavender and Lovage – two fabulous blogs who have run this link up for a year now. The theme for this Christmas-y month is Chocolate so hopefully these will fit right in!

December teatime treats

Christmas-Brownies

And, a final thought…

Should these be called Cupcakes or Muffins?? And what is the difference anyway?

Searching on the internet, the comments I have seen suggest variously that Muffins are made with oil (so these are cupcakes), and Cupcakes have icing (so these are Muffins)?

But the best comment I saw was here:

“If you throw a cupcake against a wall you get a sound like “pouf”; if you throw a muffin against a wall you get a sound like “thud” !

What do you think?


Posted in Baking, Desserts | Tagged , , , | 9 Comments

Chicken in Ginger and Lime

I thought it was time for an ‘everyday’ recipe this week. Wall-E cakes are all very well but (I have to be honest) the preparation time was measured in days rather than minutes! So, lets return to simpler fare with this quick evening meal.

This recipe was inspired by one that I saw on TV years ago. It’s one of my favourites at the moment – it doesn’t take too long to prepare, everyone likes it (in my house) and it has a lovely surprising flavour. Fresh lime juice cuts through salty soy sauce to complement the meltingly tender chicken perfectly. And all on the table in less than 20 minutes if you marinade the chicken the night before!
I hope it works for you too.

Chicken in Ginger and Lime

(Serves 4)
(Fridge to Table time – about 30 mins – but allow longer for marinading if you can)

You will need:

  • 4 chicken breasts
  • Juice of 2 limes
  • 3 tablesp of light soy sauce
  • 1 teasp chopped garlic
  • 1 teasp chopped ginger
  • Oil
  • 1 dessertspoon plain flour
  • 200mls chicken stock
  • Enough egg noodles for 4

Method

  1. Put the juice from 1½ limes, 2 tablespoons of soy sauce, the garlic and ginger in a bowl and mix.
  2. (To cut down on preparation time I use chopped frozen garlic and ginger which you can buy from some supermarkets.)

  3. Lay the chicken breasts on a chopping board between layers of plastic (a plastic freezer bag works perfectly) and beat flat with a rolling pin. It’s a good way to work out the frustrations of the day but go a bit gently as you can beat so hard that you go through them! Aim to flatten them to about 1 cm thickness, and then cut into manageable size pieces.
  4. Place chicken pieces in the marinade, spoon the liquid over all the chicken, cover and leave for as long as you can (either 10 minutes if you’re eating them tonight or put in fridge to cook the following evening if you can).
  5. Heat a little oil in a frying pan and fry the chicken pieces until cooked all the way through (this only takes a few minutes on each side). You may have to do this in batches – add more oil as necessary. Put on a separate dish when cooked and keep warm.
  6. Boil some water in a pan and cook the noodles according to the directions on the packet.
  7. When all the chicken pieces are cooked, add 1 dessertspoon of plain flour to the juices in the pan and stir until mixed for a minute or two. Remove from the heat and add a little of the chicken stock stirring well until all blended in. Add the rest of the stock little by little and then finally add the remaining lime juice and 1 tablespoon soy sauce. Stir over the heat until boiling and nicely thickened.
  8. Slice the chicken pieces into strips and serve with the noodles and sauce poured over.

Alternatively…

…if you just want something you can put in the oven and forget for a while…

Marinade whole chicken breasts in the lime+soy+ginger+garlic mix in the fridge overnight, before cooking in the oven (covered) for about 35 mins until the chicken is cooked through.

Put the flour in a pan and add enough of the juices from the roasting dish to make a paste. Add the rest of the juices and then the chicken stock a little at a time until you have a smooth gravy. Bring to the boil. You don’t need to add any extra lime or soy sauce as the chicken has been cooked in the marinade.

Anything left over tastes great in stir-fry the next night, or in chicken tortillas!

Posted in Main Course, Quick Meals | Tagged , | Comments Off on Chicken in Ginger and Lime

Wall-E cake

Birthday cakes are a bit of a challenge aren’t they? Not only do you have to find the time, but also the creative inspiration and artistic talent to create something that may rival the fantastic Angry Bird cupcakes that xxxx’s (insert name of best friend) Mum made for the class last month!

Fortunately things have changed somewhat now that my children are older, as the tradition of taking cakes in for the class doesn’t seem to have survived the jump from junior to senior school. But despite that birthday cakes are still anticipated hugely and (sometimes it feels) are judged mercilessly!

Wall-E has been a firm favourite in our family since the film came out a few years ago – so this year I decided to try to make a Wall-E cake.

Making the whole robot in cake and icing seemed too difficult (how do you make the arms stay up?) but as I’ld recently discovered modelling chocolate, the boot + plant + rubbish seemed a possibility.

(Model template downloaded from here
designed by Steve Vanseth)

So I started with Lorraine Pascale’s ‘I can’t believe you made that Cake’. The chocolate cigarillos are simple and incredibly effective – not entirely eco-friendly though I have to admit. The only place I could find that sold them was Amazon, and as they are pretty fragile this small box of cigarillos arrived in a massive cardboard box packed with polystyrene shapes to make sure that they didn’t fragment along the way.
So far – so good, but for the rest of it – really – strawberries weren’t going to cut it for a birthday boy, and for Wall-E, of course, it just had to be (edible) ‘rubbish’!

Crushed Oreo biscuits make very realistic dirt as you can see in this photo here – so a thick layer of crumbs were scattered on top of the butter icing. It was so realistic in fact that I was asked if all the cake was edible!

Those of you who have seen Wall-E (and if you haven’t you should) will know that he is programmed to collect rubbish and crush it into small cubes. So what better to mimic this but Rocky Road? Nigella’s recipe is gorgeous and made with a mixture of both milk chocolate and white chocolate coloured with orange food gel – and a variety of different coloured small sweets instead of marshmallows – it made a passable mound of ‘rubbish’.

And then there was the boot! Modelling chocolate is surprisingly easy to work with (and also delicious!) – although there is the rather tricky conundrum of getting it soft enough to work with but not too soft that it sticks to you. It took me a couple of attempts to get this shape – I ended up moulding the front of the boot in marshmallows that I then laid the chocolate over as without something to support it it tended to collapse in on itself.

Finally: the plant – the trickiest bit I found. Fortunately I have a friend who is into cake making who ‘lent’ me some cake wire, tape and leaf moulds – and with some Electric Green fondant icing I was away!

I cut the leaves out the day before so they could dry, and made a wire skeleton for both stalk and leaves covered in tape. The leaves were stuck on with thin layers of fondant icing beneath – and were incredibly fiddly and difficult. In the end they were the least successful part of the whole, but I found the more I fiddled the more fragile everything became and the more likely the leaf was to disintegrate! But no-one complained in the end – I think they were too busy eating the rocky road!

Posted in Baking | Tagged , | Comments Off on Wall-E cake

Quick but Memorable Feasts?

Many cooking magazines, recipe websites and cookbooks nowadays have a slant towards quick meals and ‘instant’ cooking. It seems that we all want to spend less and less time in the kitchen – and I am (clearly) no different!

I read an article recently in which they argued that we lose a lot by always aiming for quicker and quicker results and that the ‘great meals’ – the ‘feasts’ – that you remember for years afterwards are those that spend a lot of time in the making. And they do have a point.

So, having said that, you can imagine that I was pleased and surprised when a friend of mine recently told me that she still remembers a pudding that I made for a dinner party she came to three years ago! She was really struck by how impressive it looked as well as the lovely fresh taste.

Now I’ve always loved having friends over but don’t like having to spend my whole precious Saturday cooking! – so I go for simple recipes. This time I had made a casserole ahead of time, and then had made Pea, Lettuce and Tarragon soup for a starter (made on the day), and for dessert we had Delia Smith‘s recipe for Peaches in Raspberry puree (published in her How to Cook book), which took me about half an hour to make the evening before.

Sadly the recipe is not on the internet so I can’t reference it here. One of the good things about this recipe is that the peaches are poached for a few minutes (in a syrup flavoured with a vanilla pod) so it doesn’t matter if you can’t find really ripe peaches. The rather hard unripe out-of-season peaches available in our supermarkets at this time of year will be just fine.

Similarly, the raspberry puree (similar to this recipe here) which is poured over the peaches, can be made with frozen (defrosted!) raspberries if fresh aren’t available.

And – it all tastes better if you make it the night before and chill in the fridge until you want to eat it. The tastes seem to mingle into a delicious raspberry-ish, peach-y whole!

Now, I agree that this doesn’t quite fulfil the definition of a ‘feast’, but I was happy that something so simple had had such an impact!

Posted in Desserts, Quick Meals | Tagged , , | Comments Off on Quick but Memorable Feasts?

Chicken and Guacamole Tortillas

Friday was not a good day. I’d arrived late at work in the morning and had spent most of the day trying to catch up. I finally got home at about 7 in the evening, dropped my bags on the floor, kicked off my shoes and wandered over to the cupboard wondering what I could graze on while I contemplated cooking supper – and just happened to click on the answerphone as I walked past.

“Sorry you’re not in…” my friends voice boomed across the kitchen. My hand froze over the biscuit tin as she carried on “… but we’ll meet you at the theatre at 7.30 tonight.”

Oh dear.

Then – the front door opened and in comes my eldest with friend (I just know they were going to have supper at friends house…) “Hi Mum. What’s for supper?”

Aaaagh!!!

Why can’t my children cook their own supper, I hear you ask? Great idea I agree – but I have to confess that I have Failed as a mother and despite coaxing / pleading / begging pathetically my eldest has managed to get to this point in his life without learning how to cook anything (apart from ready-made pizza, and I didn’t have any of that in the house).

So – it was time for a crash course in how to cook Chicken Tortillas – simple, quick and as healthy as you want to make them – and I was out of the house half an hour later!
I read a similar recipe to this out of a magazine many years ago, but have adapted it and used it with lots of different combinations since. It’s good for using up left-over chilli, cooked chicken, cheese, peppers – whatever you like. I would suggest frying the chicken in a little oil and a touch of paprika and mild chilli powder beforehand – it adds a little spiciness and heats the chicken up. We didn’t have time here so just used the chicken straight out of the packet.

Chicken Tortillas

(Serves 4)
(Fridge to Table time: 10 minutes – even if your learning!)

We used:

  • 1 packet flour tortillas
  • approximately 200g spicy cooked chicken
  • 250g pack of grated cheddar cheese
  • about 8 cherry tomatoes – chopped roughly
  • tub of guacamole
  • Shredded lettuce
  • a little oil

Method

  1. Get everything chopped and ready, and lined up beside the cooker before starting as you have to move quite fast when you get going. Heat a little oil in a thick bottomed frying pan

  2. When hot place one of the tortillas in the frying pan and cook for a few minutes. You will see that it starts to lift in places – which is time to turn the tortilla over

  3. Sprinkle some chicken, tomatoes, grated cheese and whatever else you fancy over one half of the tortilla – the tortilla is cooking quite quickly at this point so don’t hang about

  4. Fold one half of the tortilla over the other and cook for a minute or two until the bottom side of the tortilla is browned, then flip gently over to cook the other side

  5. Serve with shredded lettuce, guacomole, sour cream and extra cheese – or anything else that you wish. Then go and enjoy your evening!
Posted in Main Course, Quick Meals | Tagged , , | Comments Off on Chicken and Guacamole Tortillas

Quick Plum Brulee

Lovely juicy ripe plums are one of my favourite fruits – it was a sad day when the plum tree in our back garden died. But the plum season is so short. Our tree used to produce a gorgeous crop of plums, but it was all over in about a fortnight, and those were usually the two weeks we were away on holiday!

Supermarkets don’t seem to have seasons though and you can of course get plums year round, although they can be quite hard and difficult to ripen, can’t they?

No matter with this recipe – a few minutes in the microwave and you have warm spicy plums to use as the basis for this plum brulee. It is really quick and the children eat them without a murmer!

Plum Brulee

(Serves 4)

Ingredients

You need about one plum per person – alternatively, I usually use a large punnet of plums and have warm stewed plums with ice-cream one night and this pudding on another night.

So if you’re only making this pudding, use 4 plums and don’t forget to scale down (halve) the other ingredients.

  • 400g punnet of plums
  • 1 heaped tablespoon of soft brown sugar
  • 1 teasp ground cinnamon
  • Juice of one orange
  • 500g tub of Greek yoghurt with honey (I used Rachels)

Method

Quarter and stone the plums.
(See tip)

Spread out in one layer in a microwave dish. Sprinkle over the sugar and cinnamon and mix.

Cover with cling-film, pierce holes in this and cook in microwave on high for 4-5 mins until plums are soft.

Place a few segments of plum in the bottom of a ramekin – don’t add too much juice. Fill the ramekin up with Greek yoghurt with honey.

For the topping, you can take the easy route and sprinkle 1 teasp of soft brown sugar evenly over the top.

OR, if you have a bit more time, sprinkle one dessertspoon of caster sugar or brown sugar evenly over the top of each ramekin. Brulee – either with a blowtorch, or place under a grill pre-heated to its highest setting, until caramelised.

I hope you enjoy them!

Tip: To halve the plums, cut down to the stone with a knife all the way round the natural dip. Then take each half in a different hand and twist your hands in opposite directions. You can then do the same with the half that still has stone attached. You’ll end up with a quarter plum with stone attached – and you can easily now cut the stone away.

What’s your childrens favourite fruit recipe??

Posted in Desserts | Tagged , , | Comments Off on Quick Plum Brulee

Tuna Fish-cakes

Steamy, buttery mashed potato is one of my favourite foods, although my eldest hates it (- what’s there to hate?). But the cold and clammy version found in the fridge the next day is distinctly unappealing – combine them with fish though and they become delicious and comforting again!

Homemade fishcakes are so much better than shop bought, and these are lovely, simple and quick. Made from leftover potatoes and tinned tuna they still have a delicious fresh flavour that tastes as if you’ve spent longer making them than you have!

If you don’t have any leftovers you can mash freshly boiled potatoes – or if you are short of time (are we ever not?), buy a tub of ready made mashed potato and use that.

Tip: (updated 2/04/14) Why not try them with the deliciously zesty Lemon Yoghurt Dressing from this recipe?

Tuna Fish Cakes

(Serves 4 – makes 8 fishcakes)
Fridge to table time: 20 minutes (although should be longer if you put them in the fridge to firm up)

You will need:

  • Approximately 500g leftover mashed potatoes or a tub of ready-made mashed potato
  • 2 x 185g tinned tuna, drained
  • a bunch of spring onions – white parts sliced thinly
  • 1 teasp chopped dill (I use dried)
  • salt and black pepper
  • a little flour
  • oil for cooking

Method

  1. Drain the tuna and empty into a bowl. Flake the fish with a fork and then mix in the potato, chopped spring onions, and dill.
  2. Shape the fishcakes – it’s probably easiest to use your hands. This amount will make about 8. Put some flour in a bowl and when you’ve made each fish cake place in the flour and then turn over so that it gets a light coating of flour all over. This just helps the outer layer crisp up when cooking and makes the fish cake less likely to fall apart.
  3. Ideally you should put the cakes into the fridge for 30 minutes or so before cooking – (or even better, make them the night before) – as this firms them up a bit and again helps keep them together whilst cooking.
    But I quite often cook them straight away – just take extra care that they don’t break up when you cook them.
  4. Whenever you’re ready, cook in a little oil until golden brown on each side.
  5. And that’s it!

    I usually serve with some green veg, baby corn or salad.

What do you eat with your fishcakes?

Posted in Budget Meals, Main Course, Quick Meals, Storecupboard suppers | Tagged , , , , | Comments Off on Tuna Fish-cakes

Peach Tarts

This is another end-of-summer-recipe – in fact, an end-of-holiday recipe – born from some peaches we bought all the way back from our holiday. Yes, we drove them 500 miles in a sweltering hot car (the air con had broken) from the south of France back to good old England.

‘Why’ – you might ask, as peaches don’t always travel so well – but I love the peaches that you can buy in the South of France. They are so big, ripe and juicy and seem so different to the small hard fruit you sometimes get here that seem to go from too-unripe-to-eat to rotten in the blink of an eye (perhaps I just don’t pay them enough attention!?). So when it was time to leave and we found we had bought too many, I couldn’t leave them behind! To be honest they probably survived the 24 hour trip better than we did.

So these tarts are made with well-travelled French peaches, but I’m sure they will taste just as good if you get some from the local supermarket!

Summer Peach Tarts

(Makes 6 large or 8 medium tarts)
(Fridge to table time ~30 mins)

You will need:

  • 320 g sheet of ready made puff pastry (- well, this is supposed to be a website about quick cooking – but make your own if you wish!)
  • 1 tablespoon soft brown sugar
  • 1-2 tablespoons of good quality apricot jam
  • 3 large peaches depending on size
  • Icing sugar for dusting

Method

  1. Don’t forget to take the pastry out of the fridge 10 mins before you want to use it so that it is warm enough to unroll without cracking. Set the oven to 200°C.
  2. Unroll the pastry onto a chopping board and cut into 8 equal size squares. I made 6 here, but they were just a bit large and I would suggest aiming smaller.
  3. Grease a baking tray and lay pastry squares onto it.

    Using a sharp knife, score the pasty all the way round the border, about 1 cm in from the edge. Make sure you don’t cut all the way through. This allows the edge to rise during cooking keeping the fruit safely inside.
  4. Spread about a teaspoon of apricot jam evenly over the pastry inside the knife marks.
  5. Wash the peaches – quarter and cut each quarter into 3 slices lengthways. If you’ re aiming for perfection then peel the peaches before doing this (cover them in boiling water for 30 seconds before slipping skins off), but I have to admit that I don’t always (well – we are trying to produce results in not alot of time here! And anyway, I like peaches with their skins on – but its up to you!)
  6. If you have trouble removing the stone without squishing the peaches – cut the peach in half all the way round along the seam, down to the stone. Holding the peach with one half in each hand, twist your hands in opposite directions. One half will come off without the stone. With the other, cut the half peach in half again, and again twist. You can easily cut away the stone from the last quarter with the knife.

  7. Put the peach slices in a bowl, sprinkle over the brown sugar and mix gently until all the slices are evenly coated in sugar.
  8. Arrange the peach slices on the pastry bases and cook at 200°C for about 20 mins until the pastry is golden brown.
  9. Dust with icing sugar and eat warm with ice cream – close your eyes and remember summer holidays!
Posted in Desserts | Tagged , | Comments Off on Peach Tarts